We have some important news to share, so please read on if you're interested in what we're doing. We appreciate the great response to all the products we've brought to market so far, with many of our items selling much faster than we anticipated. So... thank you for that! But as you might already know, that success has come with a lot of non-technical work that has taken up our time and prevented us from progressing in development on projects such as Dreamcast component cables and the HD-mizer.

With that in mind, we're going to be temporarily closing down the shop beginning July 1st. We're still moving forward with placing new orders for our existing products, but while those are getting manufactured, we need to focus our attention on getting development done. We'll of course share a reopening date to the mailing list when we have one.

If there's something you'd like to order directly from us, please do it by the end of June. Though our shop will be temporarily closed after that, Castlemania Games and Retrostuff.ca will remain open and *may* have stock of whatever you're looking for.

Thanks for all the support you've shown us over the years!

Ste & Nick

Screen Shot 2018-06-11 at 8.40.49 PM.png
Posted
AuthorNickolaus Mueller

Three quick updates for you today:

1) PS2/3 cables are back in stock. As in right now.

2) Despite our best efforts, we're getting a lot of emails inquiring about a Genesis cable restock. The answer right now is that we do not know when we'll have more. We're still working out forecasts for ourselves and with our distributors, and once we have those we'll be able to place an order and give people a better idea of a date. In short: no restock on our store for at least a few months.

3) Dreamcast YPbPr cables are still in development. Unfortunately, the project hasn't been worked on since before we restocked the store in March, due to being bogged down with non-stop sales and support issues during that period. That boring stuff has slowed down recently, so we're trying our best to pick back up our pending Dreamcast tasks within the next few weeks.


Untitled.png
Posted
AuthorNickolaus Mueller

Recently, we received multiple email contacts from people in Brazil who had viewed a YouTube video that appears to offer some critical analysis of our Genesis YPbPr cable. Unfortunately, this person did not reach out to us first, so we had no chance to have a back and forth about its content before it was published. The video is in Portuguese, so we don't know exactly what is being said, but one of the emails we received appears to do a decent job of breaking down the important points. While we have some reservations about even posting a response (do we have to do this every time someone creates a video like this?), since much time was spent analyzing the claims within the video to respond in detail to the emails we received, we figured it could be enlightening for others to read.  Here's an edited-for-blog version of our email response to the person who gave us the breakdown. For full disclosure, we made some minor edits, changed some of the photos, and rephrased some of the explanations for a more generic audience. For those of you like us who are deficient in Portuguese language comprehension, the main claim in the video is that the video outputs are out of spec:

The email we received states: He first measures each signal with the contrast switch turned off and gets the following measurements: Y = ~1.06V, Pb = ~640mV, Pr = ~620mV. He tells that the Y signal is within recommended level because it's delivering 700mV of video signal plus 300mV of sync signal on this line. But he says Pb and Pr are below the recommended level of 700 mV.


Thank you for giving us the breakdown and taking the time to do so.  Now I can actually understand the content of the video.  I did watch the video in its entirety after I read your summary, just to make sure I wasn't missing any context in the test setup.  As you would expect, I have many problems with the way the testing was done, but I think my objections are justified (you can decide yourself).  Some are major points, and some are minor, but I won't go into detail categorizing them as such below.

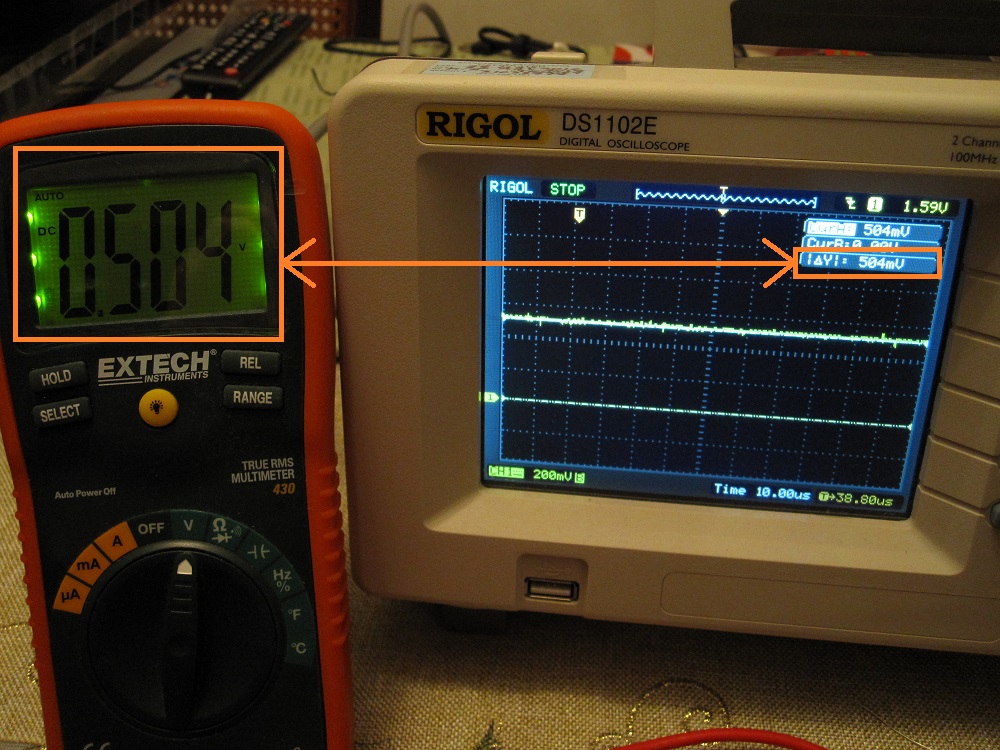
1.) When doing a video like this showing measurements down to millivolts, I personally would start by showing a rough DC validation to instill confidence in the viewer.  Many oscilloscopes drift in DC accuracy (offset and gain) over time, which is why there's a whole equipment calibration business out there with equipment calibrated annually.  Anyway, I typically set a DC power supply to 1 volt or less, measure it with a known accurate DC multimeter, and then see how close the oscilloscope measurement is to the meter measurement.  It doesn't have to be exact, but it's nice to have it within ±30mV.  Offset error (more common) is likely to be constant, so you can add/subtract it in your subsequent measurements.

 
Basic oscilloscope verification

Basic oscilloscope verification


2.) The way the measurement is being done on the scope is prone to much error.  He's using the auto-measurement tool to measure peak-to-peak voltage.  A few problems here.  First, the timescale is set way too wide, showing several frames of video within the small measurement window of the scope when we only need to measure a single line.  The auto-measurement tool has a finite time-precision so on a signal that's changing a lot within the capture window, it's not always going to be landing its time-samples where you need them to.  Plus, any random noise spikes or ringing on video edges can be reported if a sample happens to land on such an area.  You can see evidence of how poor this method is by how much the measurement on screen keeps changing, up to around 40mV (that's around 15 RGB values in an RGB 0-255 system).  The proper way to do this is to zoom into a couple lines of video, and use the manual cursors at the top and bottom of the video waveform to get the delta, since you should know where these are and what you're looking at.  I attached an example for you:

 
Plot from oscilloscope (same as verified above) of Sega Nomad using Genesis YPbPr cables. This is the Pr signal during a proper 100% colorbar pattern. Notice how the auto-measurement (red - incorrect) is higher than the cursor measurement (green - c…

Plot from oscilloscope (same as verified above) of Sega Nomad using Genesis YPbPr cables. This is the Pr signal during a proper 100% colorbar pattern. Notice how the auto-measurement (red - incorrect) is higher than the cursor measurement (green - correct).


3.) The colorbar test pattern being used is suspicious.  First, it's being described as a SMPTE colorbar pattern which implies that all the vertical bars are 75% of the maximum levels.  However, the Genesis is incapable of generating something at exactly 75%, due to its low color bit-depth (3-bits per color channel).  The closest you can get is 5/7 = 71.43%.  This is what our own test software uses to approximate 75% bars.  However, let me make the assumption that this "hacked Sonic ROM" that is being used might actually be generating 6/7 = 85.71% bars.  If we take the value of Pr he measures and apply the inverse of 0.8571 to correct it, let's see what we get: 620mV / 0.8571 = 723mV.  This is much closer to ideal, but it doesn't account for all the other caveats I'm outlining in my other numbered points.

The justification for why I think this is the case can be seen in the video itself.  Notice how the white bar is darker than the white square at the bottom of the screen.  That square is true-white while the bar is not.  It also can be seen on the oscilloscope, and the square is the reason why the luma measurement on the scope is close to ideal while the Pb/Pr ones are much lower.  The method of of auto-measuring (outlined above) captures the white square and ignores the white bar since it's shorter in height.  I attached some snips for you to show you what I'm talking about:

 
Snips explaining which parts of the video signal correspond to what is actually shown on the screen.

Snips explaining which parts of the video signal correspond to what is actually shown on the screen.


When measuring YPbPr video levels, it's proper practice to use a non-SMPTE pattern which is 100% saturation on all the vertical bars, adds a black vertical bar at the end, and also removes the junk on the bottom which is meant for CVBS and S-Video systems.  This is stated clearly in the CEA-770.2-D specification.  We actually got permission from CEA to post the relevant figure from their controlled document, and it's shown on our FAQ page: http://www.hdretrovision.com/faq#standards

I don't know why this hacked Sonic ROM was chosen in the first place.  Our own test software is clearly the correct choice for this type of test, since all the source code is available in case someone questions the validity of the pattern generation.  This ambiguity is the reason why we write our own software.  We only trust things to be done correctly if the underlying fundamentals are understood, and therefore important caveats like the inability for the Genesis to generate exactly 75% are known to us.

4.) Various consoles have minor variation in their RGB signal output.  For the darker switch setting, we based our gain adjustment across measurements from 18 different Genesis console revisions/variants and 6 Sega Master System revisions/variants.  Generated RGB signals seem to vary between 635mV and 715mV, including a slight variation of a few ohms of source impedance.  We used weighted averaging to try to make every console as close to 700mV as possible on the resultant Y, Pb, and Pr outputs after gain & offset correction.  Although I'd like it to be true, there's no way to be 100% perfect in every case.  I should also mention we have never explicitly tested and/or measured a Mega Drive from Brazil, as is reflected in our verified console compatibility list.  My gut tells me it's not going to be much different than anything else, but I think it's worth pointing out.

5.) (The email we received states: "He then mentions the contrast switch is a good feature of the cable because CRT works better with 1V on the Y line while LCD screens work better with 1.3~1.4V on the Y line, so it's good to have that option.") I don't agree with the "better for LCDs" statement.  There are objective video levels set forth in CEA-770.2-D (similar to EBU-N10-1998 which is free to view) for YPbPr video which all consumer electronics products are supposed to adhere to.  I suspect much of the confusion here is related to the 75% colorbar problem described earlier.  I think he's incorrectly assuming the white bar is supposed to be white, when in reality it's some fraction of white.  Flipping the contrast switch to the brighter setting will incorrectly boost this bar back towards 100% white.  In fact, that particular switch setting on our cable is only meant to be used with older revision Sega Master System consoles, which have very weak video output.  We measured the weak Sega Master System consoles to have an RGB output around 475mV.  This SMS correction is the true purpose of the switch feature on the Genesis cable, and should only be used with these consoles.  I had another email asking if the higher output levels when using the wrong console will damage anything, which is a valid question.  The extra voltage won't damage the circuit in the cable, since it can handle much more than we're using it for.  On the TV/display input side, the extra RMS power dissipated in the 75Ω termination resistor is negligible (few milliwatts).  Also, video input stages these days typically run off 3.3V or higher supplies, and have clamping protection if anything is beyond those rails.  Therefore, the only thing you would experience is clipping/saturation of the video signal (i.e. it will look bad and washed out).

6.) (The email we received states: "He says that, ideally, the contrast switch should affect only Luma signal, not color, and that color levels get above the recommended level anyway. He then speculates that the circuit used on the HD Retrovision cable is regulating the RGB signal levels on the input side to save costs with buffering (?), because it should have a buffer for each channel and the buffer should amplify the [output] signal instead of amplifying it on the input.") The statement about how contrast (gain adjustment) is applied only to the luma channel demonstrates a fundamental misunderstanding of video systems.  Historically, these have always been applied in the RGB colorspace, more specifically in the video transistors used to drive the CRT guns.  Modern video systems mostly run internally on the YCbCr colorspace, but the contrast control still needs to adjusted on all three channels. (See the below for a picture from Keith Jack's book demonstrating this, and also one from Charles Poynton's book).  An intuitive example which illustrates why the scheme stated in the video is incorrect is as follows.  Take the color green, convert it to YPbPr, and reduce only the Y (luma) contrast to zero.  Now you're left with zero luma, but Pb and Pr values are still non-zero.  This results in an invalid RGB color (R & B are negative!), and it makes sense since you can't have any color without any luma.  Anyway, the whole point of the gain adjustment switch on the cable is that some consoles output a high variation of RGB signal levels, and we attempt to normalize as much as possible (as described above).  Since adjusting the RGB or YPbPr gains are mathematically equivalent when done correctly, it's much easier (and more compact) to do it on the RGB input side.  It would get very complicated if it was done on the output amplifiers (with no added benefit).

Taken from Video Demystified: A Handbook for the Digital Engineer (4th Ed.) by Keith Jack - Pages 208 & 209

Taken from Video Demystified: A Handbook for the Digital Engineer (4th Ed.) by Keith Jack - Pages 208 & 209

Taken from Digital Video and HDTV: Algorithms and Interfaces (1st Ed.) by Charles Poynton - Page 346

Taken from Digital Video and HDTV: Algorithms and Interfaces (1st Ed.) by Charles Poynton - Page 346

Posted
AuthorNickolaus Mueller

We thought we'd give everybody a little insight into our painfully long, but now concluded, journey of selecting a PlayStation A/V connector for our PS1 adapter.

 
Model 2 Genesis to PlayStation 1 Adapter (Prototype)

Model 2 Genesis to PlayStation 1 Adapter (Prototype)


Chapter I: Bad Omens

The roots of this can be traced way back to July 2015, when I helped build FireBrandX a PS1 RGB JP-21 cable so that he could create XRGB-mini Framemeister profiles for PS1. His typical supplier for his cables were out of stock at the moment, so I offered to help. For this, I used an A/V connector I salvaged from a junky aftermarket PS2 YPbPr cable I got off eBay. After building the cable, I tried it out on a couple of PS1 consoles and noticed that on at least two of them, the fit was extremely tight, both on insertion and removal. I also tried fitting it in a couple PS2s, which didn't feel nearly as tight as the PS1s. Anyway, I informed him about this so he was aware, but it didn't affect his testing and he was only using it temporarily to create the profiles.

After getting my first taste of a poor A/V connector fit, I tried a bunch of different cables I had lying around. I noticed that the first no-name PS2 YPbPr cables I had ever bought several years prior fit way better than the newer ones I had on hand. There are two distinguishing features to the older 3rd party cable: (1) the plastic part of the connector has an oval indentation, and (2) the audio wires are held together by a piece of heat-shrink tubing instead of a plastic clip. Also worth mentioning, both the official Sony branded PS1 SCART and PS2 YPbPr cables I owned fit great without any issues.

Distinguishing features between "bad" fitting cable (left) and "good" fitting cable (right)

Distinguishing features between "bad" fitting cable (left) and "good" fitting cable (right)

Official Sony PS2 YPbPr (left) and official Sony PS1 RGB SCART (right)

Official Sony PS2 YPbPr (left) and official Sony PS1 RGB SCART (right)

I bought a bunch of samples from various eBay vendors to see if I could find the better fitting version. After many failures, I got lucky with a seller in Canada. After confirming the sample was what I wanted, I asked the vendor for more information on where these were acquired from. He didn't know anything beyond that he's selling from the same batch he's had for years, so I instead purchased a box of about 20 pieces. The intention was to hold onto them in case we needed plenty of samples to send to future suppliers for a match. At this point in history, Nick and I were still intending to build our SNES & Genesis YPbPr cables in the USA, so we were dealing with Chinese suppliers directly.


Chapter 2: A Futile Search

Fast forward 6 months to January 2016, when we flew in to meet our newly hired contract manufacturer (CM) for our SNES & Genesis YPbPr cable project which was in the process of being transferred to production. While there, we gave them some A/V connector samples for Saturn, Neo Geo AES, and PlayStation. This included one "bad" PS1 connector and one "good" PS1 connector. Throughout 2016, we received various samples our CM acquired from overseas. Neo Geo was a one-and-done deal, while we rejected three Saturn samples before landing on one that worked. However, every PlayStation connector we received was of the "bad" fitting variety. We rejected several of these, and this prompted an analysis into why these fit worse than the "good" variant we were happy with.

Two incorrect Saturn connector samples (left) and one correct Saturn connector sample (right)

Two incorrect Saturn connector samples (left) and one correct Saturn connector sample (right)

It turned out that the tension introduced by the displacement of the metal pins were the cause of the excess force required for insertion/removal. In the "good" variant, the pins had more room to move upward while they pressed up against the flat surface in the mating console connector. A closer analysis showed that the construction of the pins in the official Sony connectors were much different than either aftermarket version. Instead of a solid piece of metal being displaced, in the Sony connector the tips were bent and folded back to form a springy type of contact during mating. The problem with the solid non-springy types was that while they fit OK in composite video applications with only a few pins populated, the ones sold for RGB applications have all 12 pins populated, increasing the amount of tension significantly. We confirmed this suspicion by taking a tight fitting "bad" connector, clipping all the pins, and then seeing that the fit transformed from a death-grip into something that slipped in and out like butter. Regardless, after much reluctance we finally said "OK" to the poorly fitting connector (for now) since that's all they could find and we wanted to proceed with the project.

Solid pins (aftermarket) vs. springy pins (official Sony)

Solid pins (aftermarket) vs. springy pins (official Sony)

After finishing up signal measurements for Saturn and PlayStation, we were able to calculate internal resistor values and create technical drawings in February 2017 to send to our CM for quote. Based on our drawings, I made prototypes using the sample connectors to verify the electrical design. When testing out the PS1 adapter, I had so much trouble removing it from one PlayStation console that I elbowed some drywall (ouch!) with the excess force when it finally disengaged. This event, combined with other opinions from friends and colleagues, put us in a position where we were no longer comfortable with using this connector. Therefore, we put the PS1 adapter project on hold and asked our CM to take more time in locating something else.

During Spring 2017, our CM sent us a couple new connector samples. Although they were slightly different in construction, they still didn't fit any differently than the previous samples since they used the same solid non-springy pin design and didn't include excess room for the pins to easily displace upward. In parallel with this, I started buying every aftermarket PlayStation cable variant I could find which had all 12-pins populated. I wanted more data points to verify that everything being manufactured these days were all using the same tight-fitting connector variants. This unfortunately ended up being true, which meant that the better fitting variant we encountered a while back is an old design that is no longer "in print".

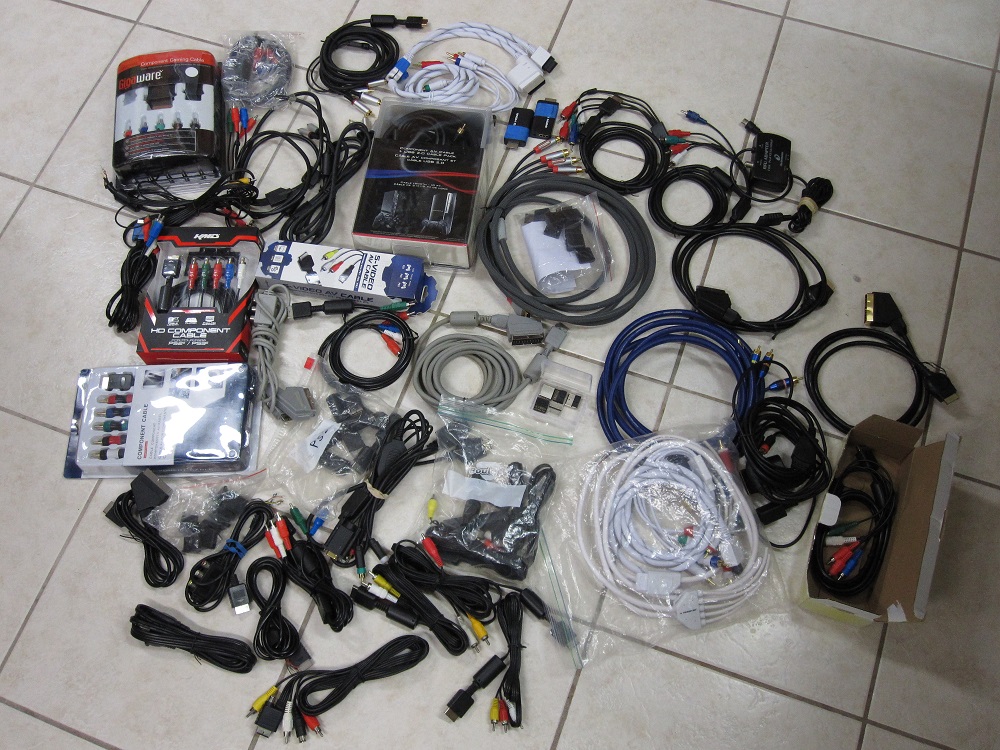
Contents of "the PS1 Box", i.e. various cable/connectors we tried

Contents of "the PS1 Box", i.e. various cable/connectors we tried

Chapter III: The Custom Connector Debacle

With all these roads leading to failure, in May 2017 we asked our CM if they could subcontract a supplier to spin us up a custom connector with springy pins like what the official Sony cables had. We bought and sent them a couple official Sony PS3 YPbPr cables to base the design off of. They asked around and finally found one factory which said they would do it for $(a large sum of money)....all in advance. Another caveat was that they first required us to specify hard numbers for the upper and lower limits of insertion/removal force, such that they could properly validate the design once completed. Because we were planning to eventually build PS2 YPbPr cables using this same connector, we were able to justify spending this kind of money upfront since this cost could be absorbed across more units. Up against a wall at this point, we agreed to proceed down this path and began figuring out min/max force specifications for insertion and removal.

We had never done this type of analysis before, and I actually got help from some mechanical engineers at my day-job. I purchased a force gauge which I estimated to be in the correct Newton range and prepped three different connectors for test:

A = Bad fitting aftermarket

B = Good fitting aftermarket

C = Official Sony from PS3 cable

We attached a PlayStation 1 console to a special table so it was properly held down and immovable. The force gauge came with a flat plate-looking thing for push (insertion) testing, and a hook for pull (removal) testing. The push was straightforward, but the pull required a small hack where we drilled holes in the connectors and attached thick zip-ties to form a feature for the hook to grab onto. The force gauge had a RS-232 serial port for connecting to a PC with the provided software, so we were able to view the measurements in real time and record them.

Force gauge, push/pull attachments, and A/V connector samples under test

Force gauge, push/pull attachments, and A/V connector samples under test

PlayStation A/V Connector - Force Measurement Data

PlayStation A/V Connector - Force Measurement Data

After getting the data, Nick and I needed to distill this down into min/max numbers we could provide to the sub-contracting factory for design verification. We used numbers we found in both the HDMI and USB specifications as rough starting targets since the HDMI Type-A and USB Type-A plugs are of similar physical size and require a similar grip by the end-user. First, we had to quickly study up on the standardized testing method used for HDMI/USB and defined in EIA-364-13. Our force gauge measurements on the PlayStation connectors were not tested the same exact way, so we had to make some minor adjustments to these numbers to account for the difference in test method. We spent a good deal of time playing around with the limits, considering typical uses, worst cases, best cases, and various other nuances. Since we were going to be paying a great deal of money, we wanted good specifications but also needed them to be reasonable and achievable. After a few nights of discussion, the limiting values we settled on were sent to our CM in early Summer 2017 so they could pass them off to the factory.

 
PlayStation A/V Connector - Desired Force Specifications

PlayStation A/V Connector - Desired Force Specifications


The first thing that we heard back was that the price changed to $(even more money), still all upfront. Being out of good options, Nick and I reluctantly agreed and asked for an official quote. In only a short amount of time we were informed by our CM that this factory changed their minds and didn't want to offer this service anymore. This left us with the impression that this factory was toying with us and had no intention of ever doing this, instead quoting high numbers in an attempt to shoo us away. This was a huge bummer, and there was nothing we could do at that point. We had no one else on deck that wanted to take on the job of creating tooling for a new connector, not to mention that we were already behind schedule on getting the PS1 adapter into production. Therefore, this path for designing our own proper PlayStation connector was scrapped. Although a lot of time was seemingly wasted on this approach, we still learned a lot of valuable information in the process.


Chapter IV: A New Hope

It was the end of Summer 2017 at this point. Our last ditch effort was to search on our own for aftermarket connectors, since we were more familiar with what we wanted than our CM was. Nick took photos of the features we wanted (oval indentation & heat-shrink tubing) and spent many late nights chatting with overseas suppliers. While Nick was working on this, I was experimenting on a separate compromise plan which involved removing unused pins from the connector to reduce mating tension. Removing two pins provided a barely noticeable difference, while removing a third was a satisfactory improvement. It was still tight, but no longer a "death-grip". Unfortunately, Nick's quest ended up in nothing except additional bills for sample shipments. Despite pictures from the company that suggested they might have the "good" connector, everything we received was no different than what we already had. It was once again confirmed that the "good" connector was no longer manufactured.

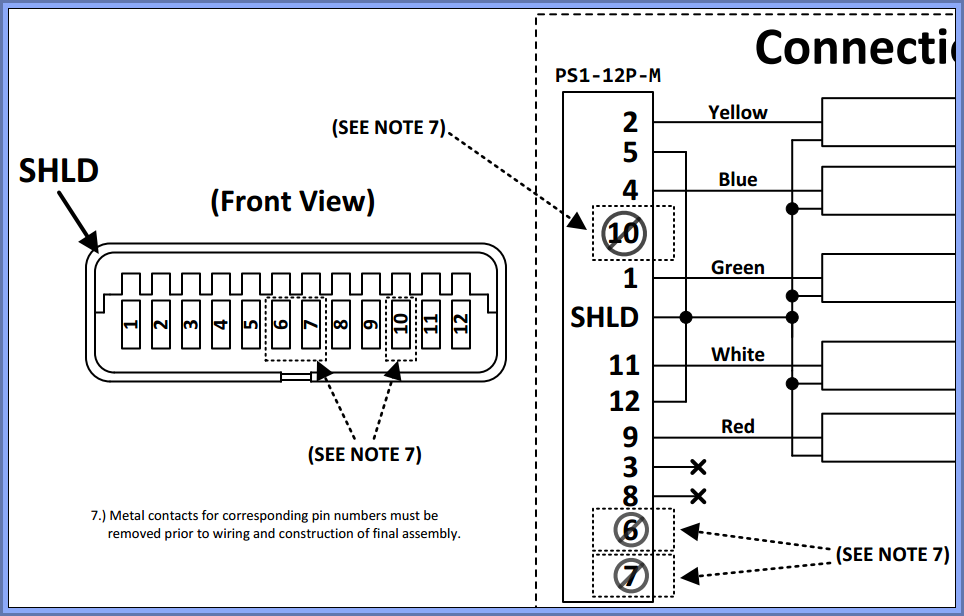
Our only option at this point was the pin-removal approach. To avoid confusion and just to make things simpler, we wanted to use the same connector for the PS2 YPbPr cables we intended to make. Even though the PS2 YPbPr cable can drop some additional connector pins, we were less concerned with PS2 and PS3 console connectors since the fit is way less tight than with PS1 consoles. We asked our CM if they could get the connector supplier to provide the connectors with the pins already removed. At first, they only provided a procedure that our CM's factory would have to follow, but that could result in a significant percentage of damaged connectors. In an attempt to finally move forward on finalizing a solution, we agreed to cover any losses occurred during this process. However, we finally caught a break in this nonstop pummeling of failure, because after some additional negotiations the supplier changed their mind and agreed to remove the pins themselves. We altered our drawings, got revised quotations, and placed an order for the plastics tooling required for both the PS1 adapter and PS2 YPbPr cable.

 
Snip from PS2 YPbPr Cable drawing indicating removal of pins

Snip from PS2 YPbPr Cable drawing indicating removal of pins


And that's where we are right now. Samples for the PS1 Adapter and PS2 YPbPr are expected to arrive in January 2018. If everything goes well and they are approved, we will proceed into production. Hopefully all the snags we encountered in this insanely long journey are behind us and we can provide you with solutions for the PlayStation series of consoles very soon.

Posted
AuthorSte Kulov